Tag Archives: construction

New Pergola @ Lost Arts House – COOL!!

It’s cool under the new Pergola shade structure at the Lost Arts House.

The New Blue Hen Pergola

With temperatures breaking new records, it’s great to have the back deck shaded from the hot afternoon sun.

Resident plants are lantana, penta, basil, sage, and oregano, which makes a lovely hanger. In the garden below the deck are more Lantana and all the animals’ favorite: Mexican Sunflower. (Tithonia Diversifolia)

In the record heat we’re experiencing this summer, we have to water the hangers everyday at least once! It’s so nice to have shade on the hot and sunny back deck, and the plants double as a butterfly garden!

The Main Garden

With temperatures hovering between 95 and 98 degrees and heat indexes over 120 (!), it’s been a very uncomfortable summer for animals, plants, and people! The only crop that chugs right along in the hot and humid is the cover crop, cowpeas.

We won’t start the Fall garden until the heat has broken, probably October! By then we’ll have starts for the cool weather crops, cabbage, broccoli, kale, bok choy, and direct seed the collards and carrots. Can’t wait…

In the meantime we’re rescuing the Main Garden from this year’s dominant weed…three feet tall and with a tap root to rival the tallest Long Needle Pine.

Happy Homesteading,

T.

How to Build Herb Shelves

An inside construction project, an Herb Shelf out of #2 pine. These dimensions are for our shelf, which is 25″ width x 15″ depth x 37″ height
Make your shelves far enough apart to hold your dried herb or seed jars.  Ours are 12”, 12”, and 10”.

1×6 #2 pine 8ft
1×8 #2 pine 8 ft
1×10 #2 pine (measure for top)

2 – 2×4 (not pressure treated!) 8 ft
3” deck screws
Small finish nails
Wood Glue

Cut one 2×4 in half widthwise.   Rip each half in half again lengthwise. You will have 4 – 2×2 (1 3/4 x 1 1/2) for legs. Cut each leg to 3 feet, or desired height.

herb shelf construction
Add width pieces top and bottom.

attach cross pieces

Rip second 2×4 in half lengthwise. Cut 4 lengths for desired width. Cut 8 lengths for desired depth. For each joint, use either one deck screw and wood glue or 2 deck screws.

Screw 2 of widthwise-2x2s inside legs at top and 2 at bottom. At bottom, leave 2” for feet.   This is front and back. Mark shelf heights on sides. (Remember that the shelf height is measured from the top of the cross piece to the top of the higher cross piece above.)


Screw 8 of depthwise – 2x2s to front and back at top and bottom and desired shelf heights.


Cut 3 sets of lengths of 1×6 and/or 1×8 to width for shelves (Depending on the desired dimensions, use one or the other or a combination to get the depth you want.)


herb shelf construction
Notch shelves

Notch the front and back shelf boards to fit the 2×2 legs (1 3/4 x 1 1/2)


Attach top and shelves with finish nails

Cut the 1×10 to fit the top, leaving a 1 1/2” overhang at front and back, if desired.   Attach the top and shelves with finish nails.


herb shelf
Sand, prime, and paint


Wood putty all nail holes. Sand, prime, and paint the shelves.


Add herbs…

herb shelf
Add herbs…

DIY Livestock Watering System


This watering system is made primarily of 1 inch PVC pipe attached to a 50 gallon plastic drum.  The pipe runs out of the bottom of the drum to a lowered drain spigot, which allows you access to drain the water or clear any solid material that may get into the pipe.  The water drum should be positioned in the shade and higher than the other end of the pipe, so that the water is gravity fed along the pipe.

The pipe then runs the length of the structure on the inside of the pen.


The pipe is secured to the structure with pipe clamps.


An additional drain spigot is placed at the far end.  Remember to make it downhill from the tank.


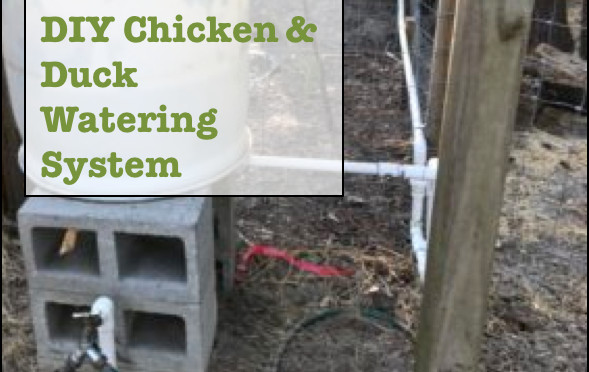
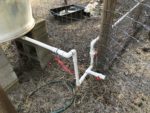
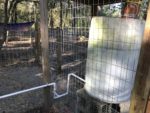
A 4-5 foot pipe should be placed perpendicular to the main pipe and left open at the top.  The top of the pipe should be higher than the tank.  This will equalize the pressure in the pipe and prevent a vacuum when the pipe is drained.


Drill holes and insert pop-it waterer nipples into the holes along the pipe. Make sure that you put waterers in both inside and outside pens. For small chicks, provide a “step up” with a two by four or piece of fencing post.   Fill the tank with water and add a small amount of apple cider vinegar to prevent mold inside the tank.


We have used this system successfully with our chickens, ducks, and geese.    The same system will work for hogs, sheep, and even dogs using the larger nipples pop-its.  Make sure to raise the tank high enough so that there is enough water pressure to the heavier nipples.    Note that hogs like to drink in between mouthfuls and may prefer a greater amount of water in a shorter amount of time than they can get  from one of the nipples, especially if there is competition at the trough!

Happy Homesteading,

T.

Feather Pen Post